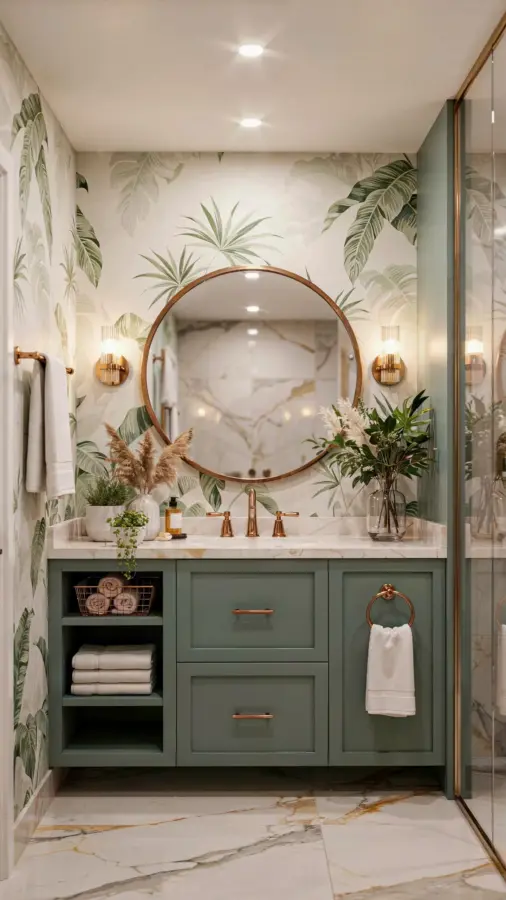
Green bathroom makeovers have this magical way of making a small, boring space feel like a secret garden. I’ve been scrolling through before and after photos of green bathroom renovations for weeks now, and honestly, the transformation is wild. What was once a beige box with a builder-grade mirror becomes this moody, character-filled retreat that feels like it’s been there for a century. And the best part? You don’t need a bottomless budget or a contractor who speaks fluent Pinterest to pull it off.
The whole trick is balance. Too much green can feel like you’re showering inside a spinach smoothie. Too little and you’re just painting a wall and calling it a day. The makeovers that really work mix one bold green element with vintage warmth and modern practicality. Think emerald subway tile behind a white pedestal sink, or a deep sage wall with a clawfoot tub that you actually use, not just photograph. It’s about creating contrast, not chaos.
Before you buy a single can of paint, decide which green is doing the heavy lifting. There are basically three families to choose from. Jewel tones like emerald and forest green feel rich and dramatic, perfect for tile. Muted sages and mosses read softer and make a small bathroom feel more airy. And then there are the weird in-between shades, olive, celadon, even a green that looks gray in low light, which are honestly the most fun to play with.
Here’s how I think about it. If your bathroom gets decent natural light, go one shade darker than you think you want. The light will bounce around and make it feel deeper and more expensive. If you’re working with a windowless box, stick with lighter greens and add mirrors, because dark green with no light just looks like a cave.
### How to Pick the Right Shade of Green for Your Bathroom
You can’t just pick a green from the swatch rack and hope for the best. I learned that the hard way when I painted a bathroom in my old apartment. The chip looked like a soft, herbaceous green. On the wall it looked like pea soup, and not the good kind. So please, do what I didn’t. Buy a sample pot, paint a large piece of foam board, and tape it up for at least three days.
Look at it in the morning, at noon, and at night under your bathroom lights. Green changes so much depending on the bulb. Warm yellow lights make green look more olive. Cool white LEDs pull out the blue, making it feel more minty or teal. If you’re using this bathroom at night most of the week, the nighttime version is basically the real version.
Also, think about the fixtures that are already in the room. Brass and copper tend to warm up green. Chrome or nickel make a green tile feel more modern and crisp. If you have a cream or vintage tub, lean toward sage or muted green. If your sink is white and sharp, go for a bold emerald.
### Mixing Vintage Fixtures with Modern Green Tile
This is where the magic happens, and it’s easier than you might think. The secret is to let the vintage piece be the star while the green tile plays the supporting role. A clawfoot tub, a hexagon floor tile, or a pedestal sink all bring that old-world charm. Then you add modern touches like rainfall showerheads, wall-mounted faucets, or heated towel racks.
I love the look of an emerald green subway tile on just one wall, usually behind the tub or vanity. Keep the other walls white or a soft warm cream. That way the green feels intentional, not overwhelming. If you’re lucky enough to have a vintage dresser or repurposed cabinet as a vanity, let that dark wood sit against the green. The grain shows up so much better against a colored wall than it ever does against white.
One of my favorite before and after photos I’ve seen had a cracked bathroom vanity that someone replaced with an antique washstand. They painted the walls a deep jungle green and added a modern glass vessel sink on top. The result? Absolute perfection. It looked old and new at the same time, like the room had always been that way.
### Copper Accents That Bring Out the Best in Green
Look, copper and green are basically a power couple. That warm, burnished orange-brown against a deep green wall? Instant chemistry. Copper faucets, shower frames, or even small accessories like soap dispensers and towel hooks can totally change the feel of the room. You don’t need to go overboard. Honestly, three or four copper accents is plenty.
Let me say this though. Real copper tarnishes and changes over time. If that’s not your vibe, go with a brass or rub-and-buff finish that looks similar but won’t oxidize. I once installed a real copper sink and spent a year watching it patina into something that looked like a science experiment. Some people love that. It drove me nuts.
A simple bulleted list of copper accent ideas that always work:
– A slim copper mirror frame, preferably round or arched
– Copper faucet or sink mixer tap in a brushed finish
– A small copper shelf or a floating caddy for bath products
– Copper light fixtures with warm Edison bulbs
– A copper tub caddy for reading while you soak
If you’re nervous about committing to copper plumbing, start with accessories. Swap out a generic shower curtain rod for a copper one, or add a copper wastebasket. It’s a cheap test run to see if you love the combo before you go all in.
### Step-by-Step Bathroom Makeover Process for Beginners
Ok so here’s the practical part. You want a before and after moment, but you don’t want to rush in and mess up your tile or plumbing. Start with the easiest win: paint the walls. That alone will transform your bathroom more than anything else. Choose your green, prep the surface, and use a moisture-resistant paint or a satin finish that can handle steam. It takes a few hours and costs maybe fifty bucks.
Next, tackle the hardware and fixtures. Replace the faucet, the shower head, and the drawer pulls on your vanity. This is a cheap swap that gives you the biggest visual return. Then move on to the vintage element. Maybe you score a clawfoot tub on Facebook Marketplace, or you just pick up an antique mirror from a flea market. For under a hundred bucks, you can usually find something with character.
Finally, bring in the textiles and finishing touches. New towels in a contrasting color, a bath mat that doesn’t slide, and maybe a plant that tolerates humidity. Make sure you seal any natural stone or grout with a strong sealant, because bathrooms are tough environments. And don’t skip ventilation. All that green beauty will fade fast if you’ve got mold creeping into the corners.
If you’re planning a full reno, do the floor after the walls. Hexagon tiles in a pale green or classic black and white checkerboard anchor the vintage look. But if you’re renting or on a budget, a simple bathmat can fake the pattern just enough to scratch the itch.
### Small Bathroom Green Ideas That Actually Work
Small bathrooms are the absolute best candidates for this style, and here’s why. A tiny room gives you permission to be bold, because you only have a few square feet to cover. Paint all four walls in a dark green and it feels like a cozy little jewel box. Pair it with a big mirror and a bright light fixture, and the smallness becomes a feature, not a flaw.
One of the smartest moves I’ve seen in small bathrooms is using green on the ceiling instead of the walls. Top-to-bottom color draws your eye up and makes the room feel taller. It also keeps the walls neutral for the vintage shelf or fretwork you’re installing. If your ceiling is flat and white, a deep moss or forest green up top looks genuinely luxurious.
Another trick is to use green in the smaller details if you can’t paint. Green soap bottles, a green shower curtain with a subtle pattern, green towels rolled neatly in a basket. It won’t look like a full makeover, but it will look intentional. That’s what separates a nice bathroom from a designed one.
### Final Touches and Practical Storage Solutions
No bathroom makeover is complete until you’ve solved the storage problem. Vintage medicine cabinets are perfect for this style, and you can usually find them at salvage yards for less than a new builder-grade one. The mirrored door opens up and gives you shelves inside, which is honestly the best part. If you can’t find one, an over-the-toilet shelf with a wood frame works great.
You want to keep the counters clean. A floating shelf above the toilet holds folded towels and a basket for toiletries. For extra space inside the shower, hang a brass or copper caddy in the corner. The goal is to have everything you need within reach, but not scattered around like a hotel room after a week-long stay.
Also, think about the transition between bathroom and hallway or bedroom. A vintage green bathroom makeover feels better when the door frame, trim, and even the door itself match the style. Painting the door the same green as the walls creates that seamless, intentional look. It’s a small detail, but it makes a huge difference in the final photo.
### Green Bathroom Renovation on a Budget
You absolutely do not need to gut the whole room to get this look. In fact, some of the most striking makeovers happen with just paint and curtains. Buy a good quality green paint in a finish that’s easy to wipe down. Add a vintage mirror from a thrift store, and plenty of cheap peel-and-stick floor tiles. The floor tiles are game-changing. They come off easily if you move, and they’re shockingly durable.
For the clawfoot tub fantasy, you don’t have to own one. A standard white tub still looks incredible with the right tile and fixtures around it. And if you really want a vintage feel, you can buy a tub shield or skirt that gives a regular tub that rolled-edge silhouette. It’s a clever hack that trips up almost everyone.
The most important advice I can give you is this. Spend money on the things you touch and use every day. The faucet, the shower head, the light switches. Cheap out on decorative stuff that doesn’t need to last forever. Nobody remembers how much you spent, they just remember the way the room felt.
Green is a fearless choice, but it rewards you every single time. Whether you go full emerald tile or settle for a painted wall and a copper faucet, your bathroom will finally have a personality. Start with one small change this weekend. Paint a side wall, swap a mirror, order a copper caddy. Before you know it, you’ll be taking your own before and after photos and texting them to everyone you know. And if you do, I’d love to know which shade of green you picked, because honestly, there’s no wrong answer.
#greenbathroom #bathroomdesign #copperaccents #vintagebathroom #bathroomreno
This post was researched and drafted with AI assistance, then personally reviewed and edited by Copper Finds Vera before publishing.
Leave a Comment