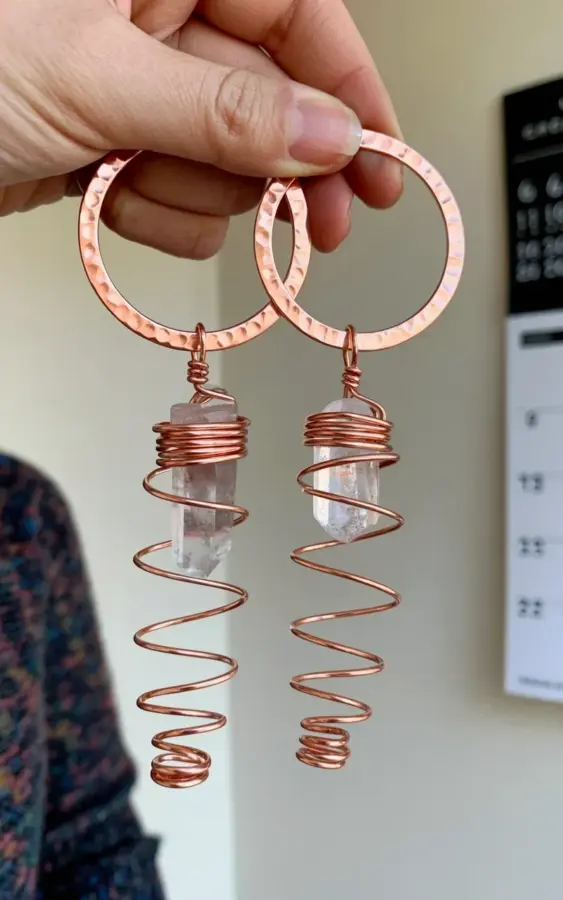
Let me show you the exact mistakes I made the first few times I tried turning raw crystal points and plain copper wire into those long spiral earrings with the big hammered rings on top. You know the ones. They look so simple in photos, all rose gold glow and organic texture, but actually getting the proportions right takes some trial and error. This particular pair finally came together the way I pictured, raw clear points wrapped securely, spirals tapering down with that beautiful hammered shine, and honestly, I learned more from the failed versions than the successful one.
Your First Mistake: Choosing the Wrong Crystal Points for copperwireearrings
Here’s the thing nobody tells you about raw crystals. Some of them are too brittle to handle the pressure of wire wrapping, and some have shapes that make them want to slide right out of your coils no matter how tight you pull. I learned this the hard way with a gorgeous piece of black tourmaline that literally crumbled in my pliers. Not fun.
For these earrings, you want crystal points that are solid at the base, nothing too druzy if you plan to wrap them tightly. Clear quartz is your best friend. Look for points that have a natural flat-ish spot near the top where your wire can anchor without slipping. And hold them up to the light first, seriously, do this before you commit, because the whole appeal of rawcrystaljewelry is that play of light through the natural facets.
One more tip on this. Wash your crystals with mild soap and water before wrapping. You would not believe how much grit and oil comes off a “clean” looking stone. It also helps the wire grip better when there is no residue in the way.
Why Your Hammered Copper Jewelry Looks Wonky: Wire Gauge Problems
Ok so let’s talk wire thickness for a second. This is where so many people mess up. They grab whatever copper wire they have lying around, usually 20 gauge or even thicker, and then wonder why their spirals look clunky and impossible to shape.
For the main spiral structure of these earrings, I like 22 gauge half-hard copper wire. It is stiff enough to hold its shape but still flexible enough to create those smooth, sweeping curves. If you go too thin, like 26 gauge, your finished earrings will bend and warp the first time you wear them. Too thick, and you are fighting the metal with every single wrap.
The hammered rings at the top are a different story. Those need heavier wire, 16 gauge or maybe 14 gauge, because they are supporting the whole design. And this is where the “copper” part of hammeredcopperjewelry really matters. Copper work-hardens as you hammer it, so what starts as a soft, bendable loop becomes surprisingly strong by the time you are done texturing it.
The Biggest Mistake in Handmade Earrings: Wrapping the Crystal Too Loosely
Look, I get it. You are worried about hiding the beautiful crystal with too much wire. So you wrap it once, maybe twice, and call it done. Then the whole thing rotates sideways in your jewelry box and the crystal falls out. This is the difference between professional handmadeearrings and something that looks like a craft project gone wrong.
Here is what works for me. I start with a fresh piece of wire and wrap the very top of the crystal point three or four times, tight against the stone. Then I angle the wire down and wrap the body of the crystal two or three more times, crossing over the base to lock it in place. It is not about covering the stone, it’s about creating a cage that the crystal physically cannot escape from.
And for the love of all things shiny, use nylon jaw pliers to flatten your wraps against the crystal. This keeps your wire from getting scratched while you pull everything snug. Your future self will thank you when the light catches that perfect surface with zero tool marks.
Hammering Technique: How to Get That Rose Gold Glow Without Ruining Your Work
So here is a fun fact about copper wire. The beautiful rose gold tone you see in the photo? It is just copper, no special coating, no magic metal. The secret is annealing and then hammering it at the right angle. If you get this wrong, your earrings will look dented and dull instead of radiant and textured.
First, anneal your copper ring before you attach it to anything. Heat it with a small torch until it glows a soft cherry red, let it cool, and then it should be nice and soft for forming. This step is non-negotiable. If you hammer copper wire that has NOT been annealed, it can crack along the edges and look terrible.
When you hammer, aim for overlapping strikes that cover the whole surface evenly. The texture should look like tiny hammered facets, not big craters. Here is a quick list of things I check before I commit to hammering:
- Is my hammer face clean and polished? A dirty hammer leaves black marks on copper.
- Am I hammering on a steel block or a surface that gives a solid rebound?
- Did I tape off the crystal so I don’t accidentally smack it with the hammer?
- Are my strikes overlapping just slightly, like roof shingles?
Take your time with this. One bad hammer strike can flatten a curve you spent ten minutes perfecting. And honestly, sometimes I just hammer the wire flat before I wrap it, not after, because it gives me more control over where the texture lands.
Design Balance: Getting the Spiral and Ring Proportions Right
This is the part that drove me crazy for weeks. Making the wirewrappedcrystals look intentional instead of accidental. The spiral needs to taper evenly from the crystal down to a delicate point, and the hammered ring at the top needs to be big enough to balance that visual weight.
My rule of thumb is this. The hammered ring should have an inner diameter of about 15 to 18 millimeters. Bigger than a dime but smaller than a quarter. If your ring is too small, the whole earring looks top-heavy and weird. Too big, and it dwarfs the crystal entirely.
For the spiral itself, I wrap the crystal first, then construct the coil downward. Each coil should be slightly smaller than the one before it. I use a tapered mandrel, which is basically a tool shaped like a cone, to form the spiral, then pull it off and reshape it slightly by hand. Someone asked me once how I get the spiral so even. I honestly just eyeball it and adjust as I go. Perfection is boring anyway, you want that handcrafted feel.
The Secret to Long-Lasting Spiral Earrings: Finishing Steps Nobody Mentions
You have made the spirals, wrapped the crystals, and hammered the rings. Are you done? Nope. Not even close. The last few steps are the difference between a pair you wear twice and a pair that becomes your favorite go-to for years.
First, give the whole earring a final squeeze with your nylon pliers. Tighten any visible gaps at the connection points. Then give it a tumble in a jewelry tumbler if you have one, or at least a good polish with a soft cloth. This removes any tarnish and brings out that warm, rose gold glow.
Second, check your ear wires. The hook part that goes through your ear. If you made these with a simple ear wire, make sure the closure is secure and smooth. Nobody wants a scratchy wire behind their earlobe. I usually use a pair of fine-tipped pliers to form a perfect little loop at the front and a nice smooth hook at the back.
What I Would Do Differently Next Time
Honestly, there is always something to improve. This pair came out great, but next time I want to try using a green patina on the rings and leaving the spirals shiny. That contrast could be really striking. Or maybe I will experiment with mixing silver wire and copper wire in the same spiral. Not sure yet.
If you are sitting on a pile of raw crystals and a spool of copper wire, just go for it. Expect the first pair to be a little wonky. Expect the second pair to be better. And by the third pair, you will be making hammered copper jewelry that you are genuinely proud to wear out in public. Save those first attempts, you will want to see how far you come.
And hey, if you have a tip for wrapping tricky crystal shapes, drop it in the comments. I am always collecting new tricks for the next project. I would love to see what you are making. Happy wrapping, friends. Go make something beautiful with your own two hands.
#copperwireearrings #hammeredcopperjewelry #wirewrappedcrystals #handmadeearrings #rawcrystaljewelry
This post was researched and drafted with AI assistance, then personally reviewed and edited by Copper Finds Vera before publishing.
Leave a Comment