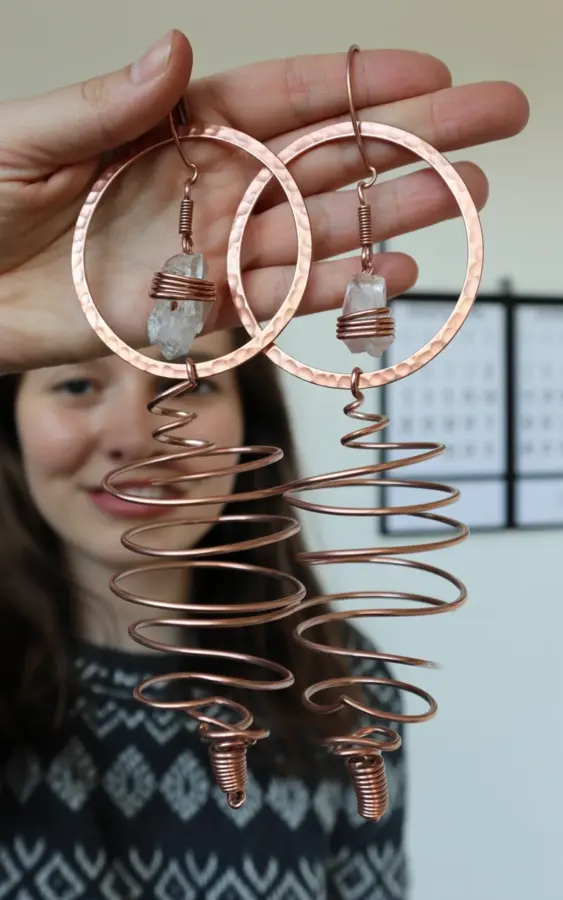
If you have ever tried making copper wire earrings with raw crystal points, you know the frustration of a beautiful design that just won’t sit right. The photo above shows exactly what we are going for: hammered copper rings at the top, a long spiral coil, and a clear uncut crystal point wrapped securely at the start of the spiral. But getting that look without the metal loosening or the crystal wobbling takes practice. I have made plenty of mistakes along the way, and this article covers the most common ones so you can avoid them.
Choosing the Wrong Wire Gauge for Your Raw Crystal Points
The thickness of your copper wire changes everything. Use wire that is too thin, and your wraps will slip under the weight of even a small crystal. Use wire that is too thick, and you will struggle to create tight coils around an uneven crystal tip.
For most raw crystal points that are about 1 to 2 inches long, I recommend 20 gauge half-hard copper wire for the main structure. It holds its shape well but is still flexible enough to wrap around irregular edges. For the spiral coils and decorative loops, 22 or 24 gauge wire works better because it bends easily without breaking.
- 20 gauge: best for the frame and top ring
- 22 or 24 gauge: ideal for wrapping the crystal and making spirals
- 28 gauge: too thin for support, but okay for tiny accent coils
If you are unsure, test your wire gauge by wrapping a practice piece around a similar shaped stone. The wire should grip without leaving gaps.
Overlooking the Balance Between Hammered Rings and Spiral Coils
A common mistake is making the hammered ring at the top too small or too heavy compared to the spiral below. In the photo, the ring is large and flattened, which creates a nice visual anchor. If the ring is too delicate, the earring will feel top heavy when the crystal swings. If it is too chunky, the spiral looks like an afterthought.
Aim for a ring diameter that is roughly one third of the total earring length. For a 3 inch long earring, a ring about 1 inch across works well. Hammering the ring flattens it slightly, which adds texture and helps it catch light. Keep the spiral coils evenly spaced so the taper from the ring down to the crystal feels intentional.
Forgetting to Secure the Crystal Point Properly in the Wrap
Raw crystals have uneven surfaces, and they can shift inside a wire wrap if you do not lock them in place. I have had crystals fall out hours after finishing a pair because I only wrapped around the base of the point and left the tip free.
Instead, bring your wire up around the widest part of the crystal (the bottom) and then cross it over the front and back. Create a small cradle with two or three tight wraps around the body of the crystal. Then use a separate piece of finer wire to wrap the top of the crystal where it meets the spiral coil. This double securing method keeps the stone from rotating.
Also, do not rely on the spiral itself to hold the crystal. The spiral should be a separate element that attaches to the wrapped crystal, not the only thing keeping it in place.
Skipping the Annealing Step for Copper Wire
Copper work hardens quickly. If you hammer a ring or bend a spiral without occasionally softening the wire, it will become brittle and can snap. Many beginners skip annealing because it adds a few minutes, but that small effort saves you from starting over.
Annealing is simple: heat your copper wire with a torch or even a strong kitchen torch until it glows a dull red, then let it cool naturally. For small sections like a spiral coil, you can also use a heat gun on high setting for 30 seconds. After annealing, the wire will bend more easily and you can hammer it without cracking.
Keep a bowl of water nearby to quench the wire after heating, but let it cool slightly first. Copper that is too hot and suddenly quenched can become brittle again. A slow cool is best for softness.
Neglecting Pat
#copperwireearrings #handmadejewelry #rawcrystalearrings #bohostyle #wirewrapped
This post was researched and drafted with AI assistance, then personally reviewed and edited by Copper Finds Vera before publishing.
Leave a Comment