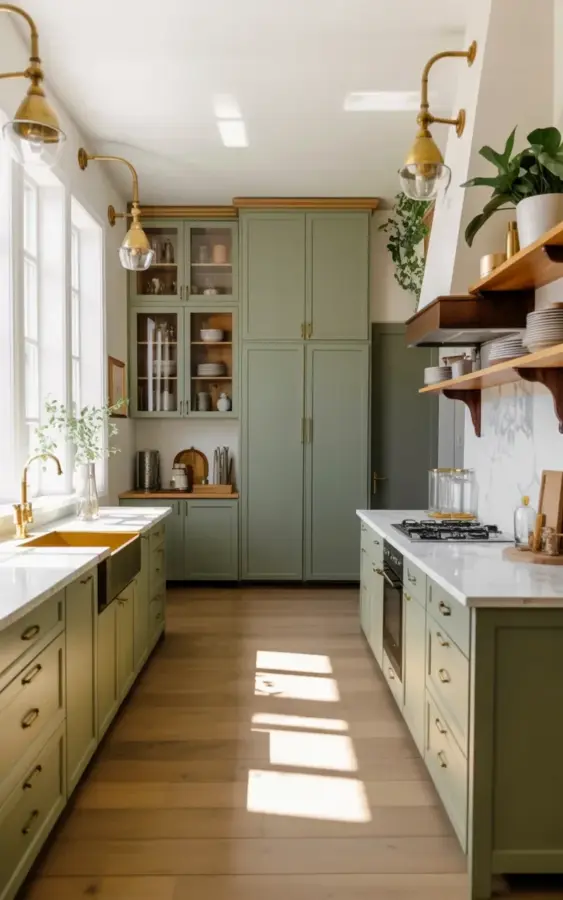
Sunday morning coffee tastes better in a kitchen that finally feels like you. That is the whole reason I took on this modern farmhouse kitchen makeover in the first place. If you are staring at your own dated oak cabinets and dreaming of something greener, I want to walk you through exactly how we pulled this off.
This modernfarmhousekitchen look is built on a simple recipe: sage green cabinetry, warm brass details, and surfaces that catch the light. It is not about perfection, it is about making intentional swaps that give the whole room a new personality. Here is how to do it without losing your mind or your budget.
Choosing Sage Green for Your Kitchen Cabinets
Pick your paint color before you do anything else. Sage green is forgiving, but it is not one shade, it is fifty. I spent a week testing samples on the actual cabinet doors and watching them change from morning to evening light.
Look for a muted gray-green with a little olive undertone. That keeps the warmth in the room instead of drifting into a cold mint. My favorite test method is painting a piece of foam board and holding it up against your countertop samples and floor swatches.
Gloss level matters way more than people think. Go with a satin or eggshell finish for the cabinet boxes and a semi-gloss for the doors. Trust me, the semi-gloss doors hold up better to greasy fingerprints and wipe clean without dulling.
Do not skip the primer. Tannins bleed out of old oak cabinets like crazy and a good bonding primer seals all that history in. We used a shellac-based primer and it made the final color look ten times cleaner.
Pairing Brass Hardware With Cool Green Paint
Here is where the magic happens. Sage green has a cool, calm nature and brass brings a warm glow that makes the whole cabinet color feel richer. It honestly looks like they were made for each other.
Go for unlacquered brass if you can handle a little patina. It develops character over time, like a favorite leather jacket. If that makes you nervous, a polished brass finish with a clear coat gives the same look without the maintenance.
Match your hardware to your faucet and light fixtures. The pull handles should all be the same size for the upper and lower cabinets, but feel free to mix a knob with a pull, just keep the finish identical. It keeps the eye moving without everything going visually chaotic.
Here is a quick checklist I wish someone handed me before I started:
- Measure the existing holes before buying, or prepare to fill and re-drill them
- Order one extra of each size, returns take forever
- Mix straight pulls with teardrop knobs for style, not all pulls, not all knobs
- Wipe brass down with rubbing alcohol before installation to remove oils
- Buy a magnetic screwdriver, your knuckles will thank you
Buying a Farmhouse Sink Without Going Overboard
That gold farmhouse sink in the photo is the heart of this kitchen. We found an affordable fireclay model and made it pop with a brushed brass finish. It is deep, like terrifyingly deep, and it swallows a full sheet pan without complaint.
The apron front is the showstopper here. It protrudes a few inches from the cabinet face and breaks up all that vertical green with a bright metallic accent. You want the flecked white surface or the solid gold? I ended up loving the gold because it ties directly to the plumbing and hardware.
Installation is not a beginner DIY project. The sink weighs about ninety pounds and requires special cabinet framing to hold it. I watched three tutorials, called a professional, and realized my skill level stops at plumbing fixture selection, not wiring and mounting.
Pair it with a single-handle bridge faucet to finish the farmhouse look. The exposed springs and cross handles give off that vintage feel while still working like a modern piece of machinery.
Mixing White Marble Countertops With a Busy Kitchen
I know marble stains, I know marble etches, but nothing else reflects morning light like this. We went with white marble with soft gray veining to keep the countertops feeling airy against the deep cabinets.
Do not be afraid to use it around the sink. The gold farmhouse sink sits right in the white marble and the combination creates a clean focal point that photographs beautifully. Just seal it properly and stay on top of spills. Vinegar and lemon juice are the enemies here, use a cutting board and clean up red wine fast.
If real marble makes you nervous, look at a quartz that mimics the veining. I can spot the difference up close but most people cannot. Given how much cooking happens in this kitchen, I half regret not going the quartz route, half love the authenticity of the real stone.
The backsplash in the photo is a simple white zellige tile with slight irregularity. It catches the light and casts a warm ripple along the wall. Simple, textured, and infinitely forgiving when you install it slightly crooked.
Installing Glass Upper Cabinets and Wooden Shelves
The glass uppers are my absolute favorite risk in this whole makeover. Replacing solid doors with glass instantly makes the tiny kitchen feel double the size. But it forces you to declutter every single dish inside.
Crisp white bowls and stacks of ceramic plates keep the display looking curated rather than chaotic. Honestly, it is the push you need to finally donate those mismatched mugs from college. We used seeded glass with a slight ripple for privacy and texture.
Then we added the wooden floating shelves along the right wall. The warm oak tones connect back to the light oak hardwood floor and give the eye a place to rest. Do not overstuff them, a stack of bowls, a trailing pothos plant, and a single ceramic pitcher is more than enough.
Installing floating shelves is about finding the studs and using heavy-duty brackets. Drywall anchors fail eventually, especially when someone accidentally leans on a shelf while reaching for a bowl. Spend the extra hour and mount them right.
Pulling the Whole Room Together With Styling and Lighting
Lighting is the jewelry of the room, so we hung large brass wall sconces with glass shades above the workspace. They provide that warm, ambient glow that overhead can lights just kill. Use dimmers, always use dimmers.
The light oak hardwood floor keeps the room grounded. During the renovation, I considered replacing it with a darker wood, but I am so glad we kept it. The pale floors bounce light around and make the green cabinets feel fresh instead of heavy.
Add a little life with plants. We tucked trailing ivy and a snake plant on the shelves, plus a small herb pot by the window. The green in the plants plays off the green in the cabinets without being too matchy-matchy.
Layer in texture with natural tones. A woven basket on the floor, wooden cutting boards leaning against the backsplash, and linen curtains soften all the hard surfaces. It all feels intentional, warm, and undeniably modern farmhouse.
So, Is This Makeover Actually Achievable?
Look, this is not a weekend project, but it is absolutely doable with a solid plan and a realistic timeline. The transformation we made took about six weeks from start to finish, mostly waiting on the cabinet doors after paint. You will live with construction dust and takeout pizza for a while.
But honestly, the result changes how you use the whole house. This kitchen is the room everyone lingers in now, coffee in hand, leaning against the marble while the light hits those brass sconces. It feels classic without feeling stuffy, and modern without feeling cold.
If this saved for future, screenshot the photo and pin it to your remodel board. When you are ready to start, focus on one element at a time and trust the process. A dated kitchen is just a fresh coat of sage green and a few brass details away from being your favorite room in the house.
This post was researched and drafted with AI assistance, then personally reviewed and edited by Copper Finds Vera before publishing.
Leave a Comment